Ceiling Fan Speed controller Wiring diagram | Fan Regulator connection
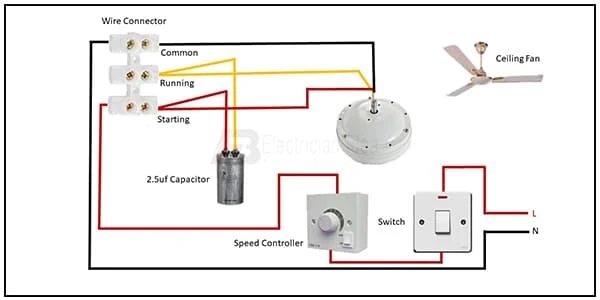
Ceiling Fan Speed controller Wiring diagram:
This diagram shows how to connect the ceiling fan speed controller wiring. In this video, we clearly try to describe how to wire a ceiling fan with a speed controller very easily. In this diagram, we use a ceiling fan a speed controller, a switch, a capacitor, and a wire connector. If you want to learn more please check our youtube video.
Diagram of Fan Speed controller Wiring:
Components Need for this Project:
You can get the components from any of the sites below:
- Ceiling Fan [See Buy Click Amazon]
- Cpacitor [See Buy Click Amazon]
- Fan Regulator [See Buy Click Amazon]
- Switch [See Buy Click Amazon]
- Terminal Block [See Buy Click Amazon]
*Please note: These are affiliate links. I may make a commission if you buy the components through these links. I would appreciate your support in this way!
$ads={1}Read Also:
Components used to make the Fan Speed controller Wiring:
01. Ceiling Fan
 |
| Fig 2: Ceiling Fan |
The main driving force behind all ceiling fan systems is the motor used inside the fan. We can also compare it with the soul of a fan. This motor converts the supplied electrical energy into mechanical energy which turns the ceiling fan and gives us air. When current is supplied, the magnetic field formed on the positive half-cycle becomes the reverse magnetic field on the next negative half-cycle. The magnitude part does not rotate and the capacitor is converted to a phase when it is connected to a phase motor or ceiling fan with a helical coil or stationing coil. When power is supplied there is a magnetic difference between the phase currents and the coils (acting as two phases) so that the motor or fan rotates.
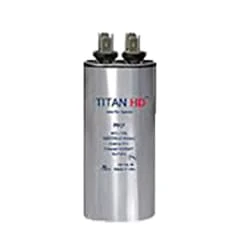
02. Capacitor
 |
| Fig 3: Capacitor |
A capacitor is basically an electric charge storage device or an electrical passive device that can store charge. Its Bengali meaning is "container" which means that holds an electric charge. And the device made by separating the two plates by placing a non-conductive material (Dielectric) between the two conductive plates is called a capacitor. A capacitor consists of a dielectric material between two conductive layers. A capacitor in a circuit stores electrical energy or charge from a source. Another popular name is a condenser.
03. Fan Regulator
 |
| Fig 4: Fan Regulator |
Reduces fan speed by switching on and off. Reducing the speed of the fan, the power Consumption is also Reduced. It is basically a wire wood resistor-based regulator. The large regulators that were used in the past took up more than half of the switchboard space and were very hot. It looks very small in size. Almost equal to a switch. Electrical regulators are basically made by winding copper wire on an iron core. As Electricity Travels Long Distances Through These Wires, Some of The Electrical Energy is Converted Into Heat Energy.
04. Switch
 |
| Fig 5: Switch |
A Single-Pole, Single-Throw (SPST) Switch. It's Got one Output and One Input. The Switch will Either be Closed or Completely Disconnected. SPSTs are Perfect for on-off Switching. They're also a Very Common Form of Momentary Switches. SPST Switches are Commonly Used in a Variety of Electrical Circuits and Applications, Such as Turning on And off Lights, Fans, and Other Appliances. They can Also be Used to Control the Flow of Electricity to Different Parts of a Circuit or to Switch Between Different Circuits Altogether.
05. Terminal Block
 |
| Fig 6: Terminal Block |
A Terminal Block Consists of Modular Housing With An Insulated Body That Secures Two Or More Wires Together. Terminal Blocks—Also Referred to as terminal Connectors, Connection Terminals, or Screw Terminals—are Used in a Wide Array of Applications Where Electrical Systems Need to be Safely Connected. Electrical Terminals are a Class of Electrical Connectors That are Used to Transfer Electrical Current From a Power or Grounding Source to use. Terminals "Terminate" by Crimping or Soldering to Wire or Cable.
Thank You for visiting the website. Keep visiting for more Updates.
$ads={2}
Frequently Asked Questions
What are the 3 speeds on a ceiling fan?
In a 3-speed ceiling fan, the switch is a device used to control the speed of a ceiling fan. It typically has settings for low, medium, and high speeds, allowing users to adjust the fan's airflow to their preference.
How many wires are in a 3-speed fan switch?
A three-way switch for a three-speed fan typically has four- wires. The “common” is connected to a power supply, and one of three “output” wires is energized depending on the speed selected - one for low, one for medium, and one for high. The fan motor has four wires, a neutral, or three “hot” wires, one for each speed.
How do I test the speed of my ceiling fan?
To find the RPM (revolutions per minute) of your ceiling fan, you could use a handheld tachometer. This device measures the rotational speed of the fan blades. Simply point the tachometer at the blades while the fan is running, and it will display the RPM.
Why is my 3-speed ceiling fan running slow?
The speed of the ceiling of the fan may slow down due to dust accumulation, motor problems, capacitor issues, wiring problems, and incorrect installation. Diagnosing and fixing the problem may require cleaning, repairs, and replacement of parts, depending on the specific cause of the issue.
Why does the ceiling fan have 3 wires?
The wire colors connected to the house: The black wire is the hot wire that leads to the switch. The white wire is neutral and completes the electrical circuit diagram. Copper or green wire is the ground wire and keeps the fan from experiencing power supply surges.


Post a Comment
Do leave your comments